
Voice Permissions and Timers
Introduction
In this article we will go over the use of the Directive and Event steps to use the Alexa Voice Permissions feature and create a timer.
Context
To use specific features like Reminders, Timers, user’s info… the user need to authorize your skill to access them by giving permissions.
This can be done by the user from their Alexa app or, more conveniently, by allowing access with their voice.
For this project, we are going to use the Connections.SendRequest directive to allow the user to approve our permission request to Timers and then, set a timer for 10 seconds.
How it works
- Your skill initiates the permission request.
- Alexa asks the user if they want to grant permission to create a specific timer.
- The user responds to the permission request.
- If the user grants permission, your skill can then create the timer. You don't need to send a card to the Alexa app, requesting for permissions.
- If the user doesn't grant permission, then your skill can't create a timer. Your skill should provide a fallback workflow if the user doesn't grant permission to create a timer.
Step 1 | Generate the Voice Permissions directive
As always when we want to integrate a new feature into our Voiceflow project, a good starting point is the Alexa Developers Documentation.
For this project, you can find it here: https://developer.amazon.com/en-US/docs/alexa/smapi/voice-permissions-for-timers.html
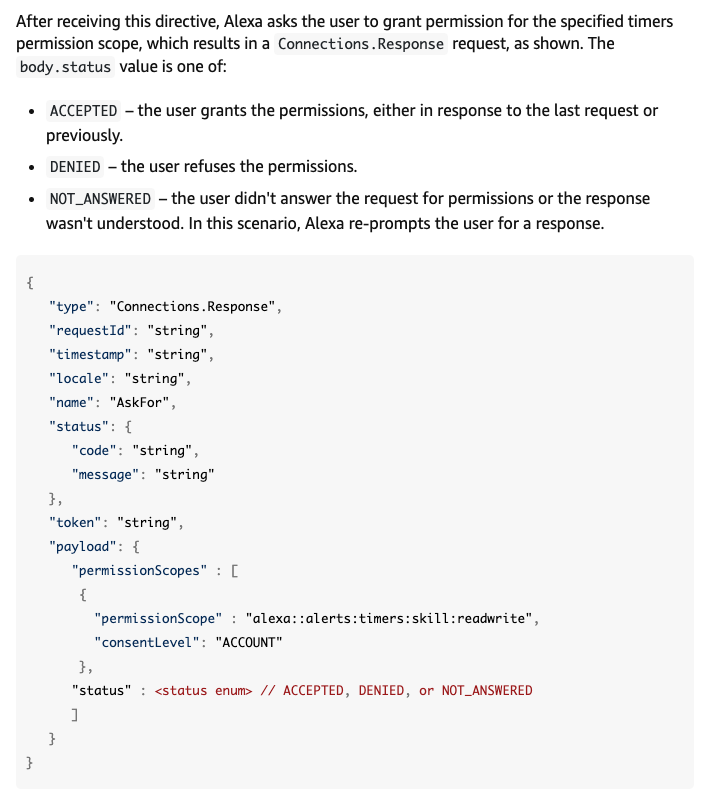
As you can see, the process needs to send a directive and check an event for the response.
Based on that response (ACCEPTED, DENIED, or NOT_ANSWERED), we will handle the logic to redirect our user.
To start, we will need to use a Directive step to send the Connects.SendRequest directive with the following payload.
{
   "type": "Connections.SendRequest",
   "name": "AskFor",
   "payload": {
      "@type": "AskForPermissionsConsentRequest",
      "@version": "2",
      "permissionScopes": [
        {
          "permissionScope": "alexa::alerts:timers:skill:readwrite",
          "consentLevel": "ACCOUNT"
        }
      ]
   },
   "token": ""
}

Step 2 | Get response from Alexa with the Event step
Asking for permission is one thing but we also need to catch the result. The Event step is made for that and again, we will also use the Alexa Developers Documentation to check what we want to look after.
As the main info we want to look at is the status returned in that event, we can setup our Event step as below
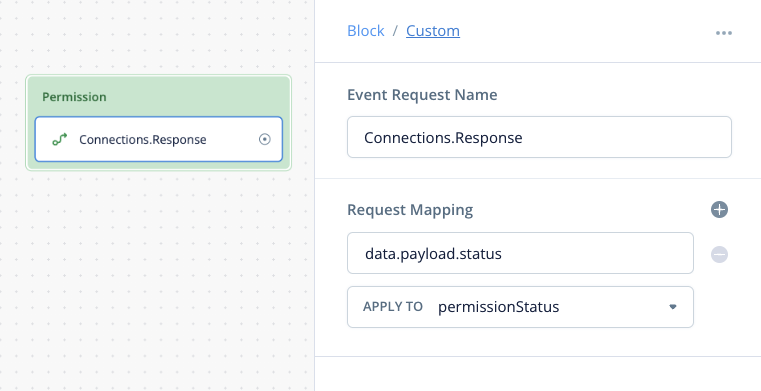
From the response (data) we want to extract the status’s value that is in the payload item.
data.paylaod.status
We map this value to the {permissionStatus} variable.
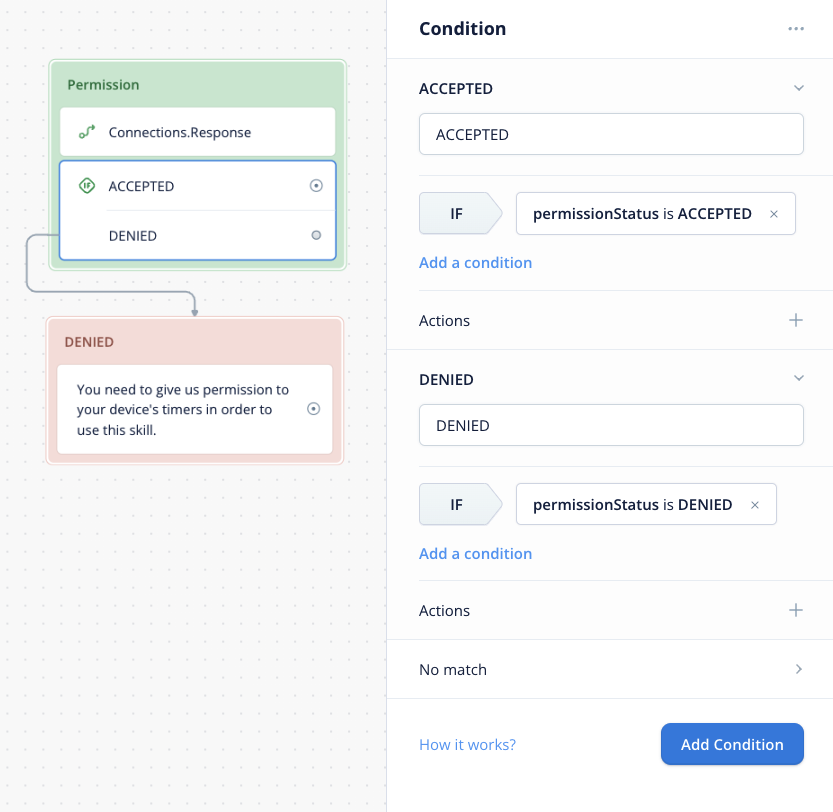
Step 3 | Create our logic based on permission status
As seen in the documentation, the status can have one of the following values:
- ACCEPTED
- DENIED
- NOT_ANSWERED
We just need to add a Condition step to handle ACCEPTED or DENIED
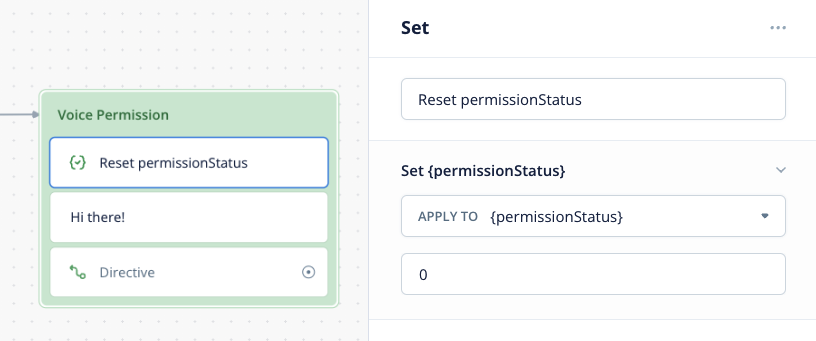
To be sure that the {permissionStatus} value is not populated with the value of a previous session (as variables declared in your project are persistent between sessions), we want to reset it to 0 each time the user start the skill.
For this, we are using a Set step in our very first block as the first step.
Step 4 | Setting up the Alexa Timers API call
In this step we are going to use the Alexa Timers API (https://developer.amazon.com/en-US/docs/alexa/smapi/alexa-timers-api-reference.html)
As you can read in the documentation, we will need to setup our API call with the corresponding endpoint as well as the user’s token.
Those information are available in the _system variable so we can use a Set step to populate the {apiEndpoint} and {apiAccessToken} variables.
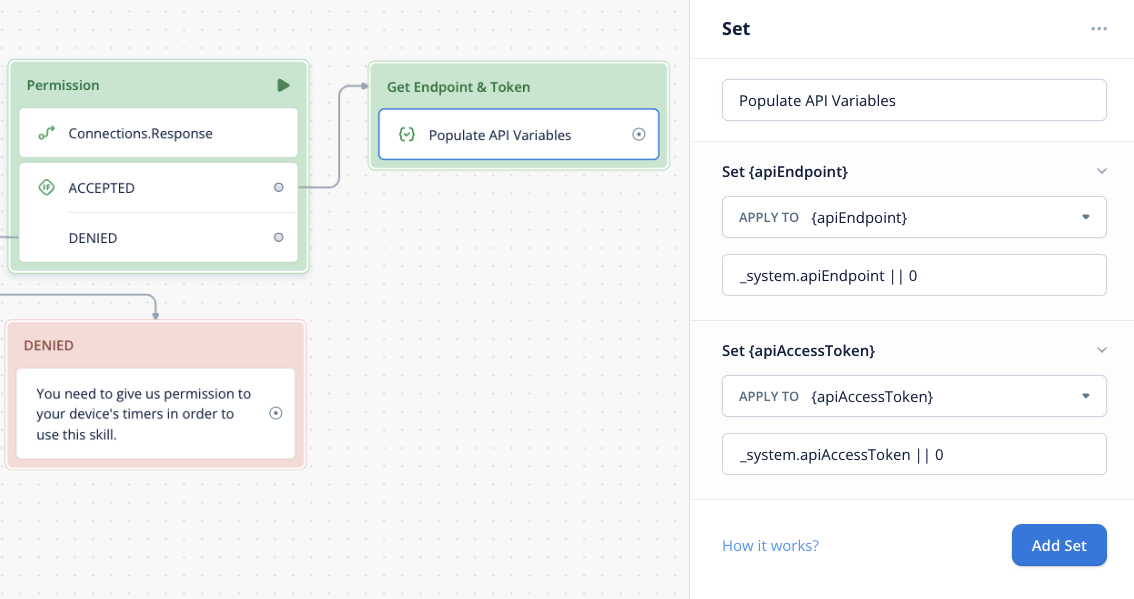
Like we’ve done for the {permissionStatus}, we can reset the {apiAccessToken} in the beginning of our project to be sure that the {apiAccessToken} hasn’t the value from a previous session.

Regarding the API Step, you want to use the full endpoint, {apiEndpoint}+the request path.
In our case we want to create a timer so the path will be /v1/alerts/timers and the full URL:
{apiEndpoint}/v1/alerts/timers
Still from the documentation, we know that the method need to be a POST.
In the Headers, the Authorization uses the {apiAccessToken} and we are setting the content type to application/json.
Authorization:
Bearer {apiAccessToken}

Content-type
application/json

The last thing we need to populate is the Body payload and do the variable mapping.
Be sure to select the Raw format for the Body
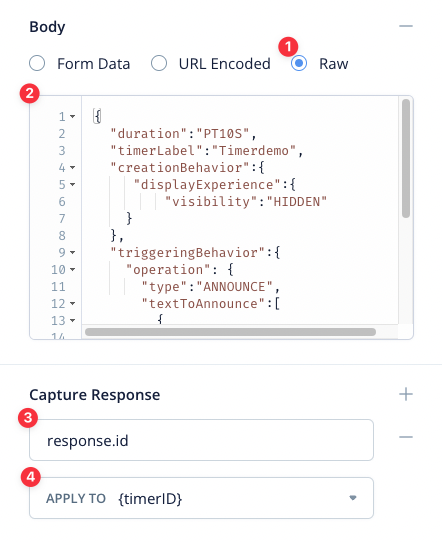
For this example, we are going to use the following payload to create a 10 seconds timer.
Again, do not hesitate to refer to the Alexa Timer API documentation for more details on the different settings available (https://developer.amazon.com/en-US/docs/alexa/smapi/alexa-timers-api-reference.html)
{
  "duration":"PT10S",
  "timerLabel":"Timerdemo",
  "creationBehavior":{
     "displayExperience":{
         "visibility":"HIDDEN"
    }
  },
  "triggeringBehavior":{
    "operation": {
      "type":"ANNOUNCE",
	    "textToAnnounce":[
	      {
         "locale":"en-US",
         "text":"This is our timer demo"
        }
      ]
    },
    "notificationConfig":{
      "playAudible":true
    }
  }
}
While this call will create a timer, you might also want to use some of the other calls available to Read, Pause, Resume or Cancel a timer from its Id.
For this, we want to populate the {timerID} variable with that information from the API step response.

To finish setup the API Step, link the Fail and Success ports to the corresponding paths or steps.
In this example, I’m using a Speak step with the sub SSML tag to show the timer Id without having Alexa to speak it out loud.

Step 5 | Adding Timer permission on Alexa Developer Console
The project is ready so we can upload it to the Alexa Developer Console.

On the Alexa Developer Console, we will have to enable the Timers permission.
To do so, access the Permissions panel from the Build tab > Tool section

At the very bottom of the page, enable Timers

Conclusion
That’s it, you can now test your skill.
The Alexa Developer Console will be able to run your test but without triggering any Timers, so keep in mind that for device related features, you always want to fully test your skill on a real device.
Video
A video covering this project is available here:
Information
💡 For each upload, you might need to wait around 3-5 minutes for the changes made into your Voiceflow project to populate on the Alexa Developer Console and being able to fully test the skill.
A good way to be sure that you are testing the updated version is to use a Speak step at the very beginning of your project with a version number. That way you can quickly know if you’re testing the correct updated version or if you have to wait a bit for your changes to propagate.
Documentation
Setup Voice Permissions for Timers
Set Up Voice Permissions for Timers | Alexa Skills Kit
Alexa Timers API
Updated 5 months ago