
How to write a function
Learn all you need to know about creating Voiceflow function code
Additional resources
Functions CMS: Learn how to manage and organize your functions effectively using Voiceflow's Content Management System.
Using the Function Step: Instructions on how to implement and configure the Function step on the Voiceflow canvas.
Functions Starter Pack: Start by importing some utility functions directly into your project. Click to download import file.
Environment limitations
Please note that certain JavaScript methods, such as
setTimeout(), are not supported out-of-the-box due to their dependence on browser or Node.js runtime APIs and not part of the ECMAScript (JavaScript) language specification itself. This JavaScript reference document describes all built-in objects supported by functions code.
Introduction to Functions
In Voiceflow, functions allow you to create reusable, user-defined steps that can perform tasks ranging from simple text manipulation to making complex API calls. This guide will walk you through the process of coding a function and utilizing network requests within Voiceflow.
Example Functions
Functions Starter Pack: Start by importing some utility functions directly into your project. Click to download import file.
Extract Chunks from a Knowledge Base Response:Click to Download
Send a Query to Mistral 7xB and Parse Answer (via. together.ai): Click to Download
Implementing Function Code
A function in Voiceflow is defined by two main components: the function interface and the function code. The function interface outlines the inputs, outputs, and paths, while the function code dictates the behaviour of the function. In this document, we'll be covering the function code only.
Starting with the Main Function
Every function is contained within the main function that is the default export. This is the entry point for Voiceflow to execute your code when the function step is triggered.
export default async function main(args) {
  // Your function logic goes here
}
Processing Input Variables
The function accepts a single value, called the arguments object, args, which contains the data passed into the function when using the function step. In this case, the args.inputVars contains a single field called text.:
const { text } = args.inputVars;
Performing Transformations
In the function, you may perform operations such as transforming text:
const uppercaseText = text.toUpperCase();
Returning Runtime Commands
The function concludes by returning an object containing runtime commands:
return {
  outputVars: {
    output: uppercaseText
  },
  next: {
    path: 'success'
  },
  trace: [
    {
      type: 'text',
      payload: {
        message: `Converting ${text} to ${uppercaseText}`
      }
    }
  ],
}
The runtime commands include:
- Output Variables Command: Assigns values to output variables.
- Next Command: Directs the assistant to exit the function step through a specific port.
- Trace Command: Generates traces that form part of the agent's response.
Making Network Requests
Voiceflow functions have access to a modified fetch API for making network requests. This enables functions to interact with third-party APIs or your own backend services.
Example: GET Request with the Fetch API
Here's how to make a GET request to retrieve data from an API:
export default async function main(args) {
  const response = await fetch(`https://cat-fact.herokuapp.com/facts`);
  const responseBody = response.json; // Accessing the response body

  // ... (process responseBody)
}
Mapping Data from Response
To map and process the data from the API response, use JavaScript array methods like map:
const facts = responseBody.map(fact => fact.text);
Creating Traces from Data
Create traces for each item you want to include in the assistant’s response:
return {
  next: {
    path: 'success'
  },
  trace: facts.map(text => ({
    type: "text",
    payload: {
      message: text
    }
  }))
}
The finished function should look like this. Don’t forget to add a path to the function interface with return value success.
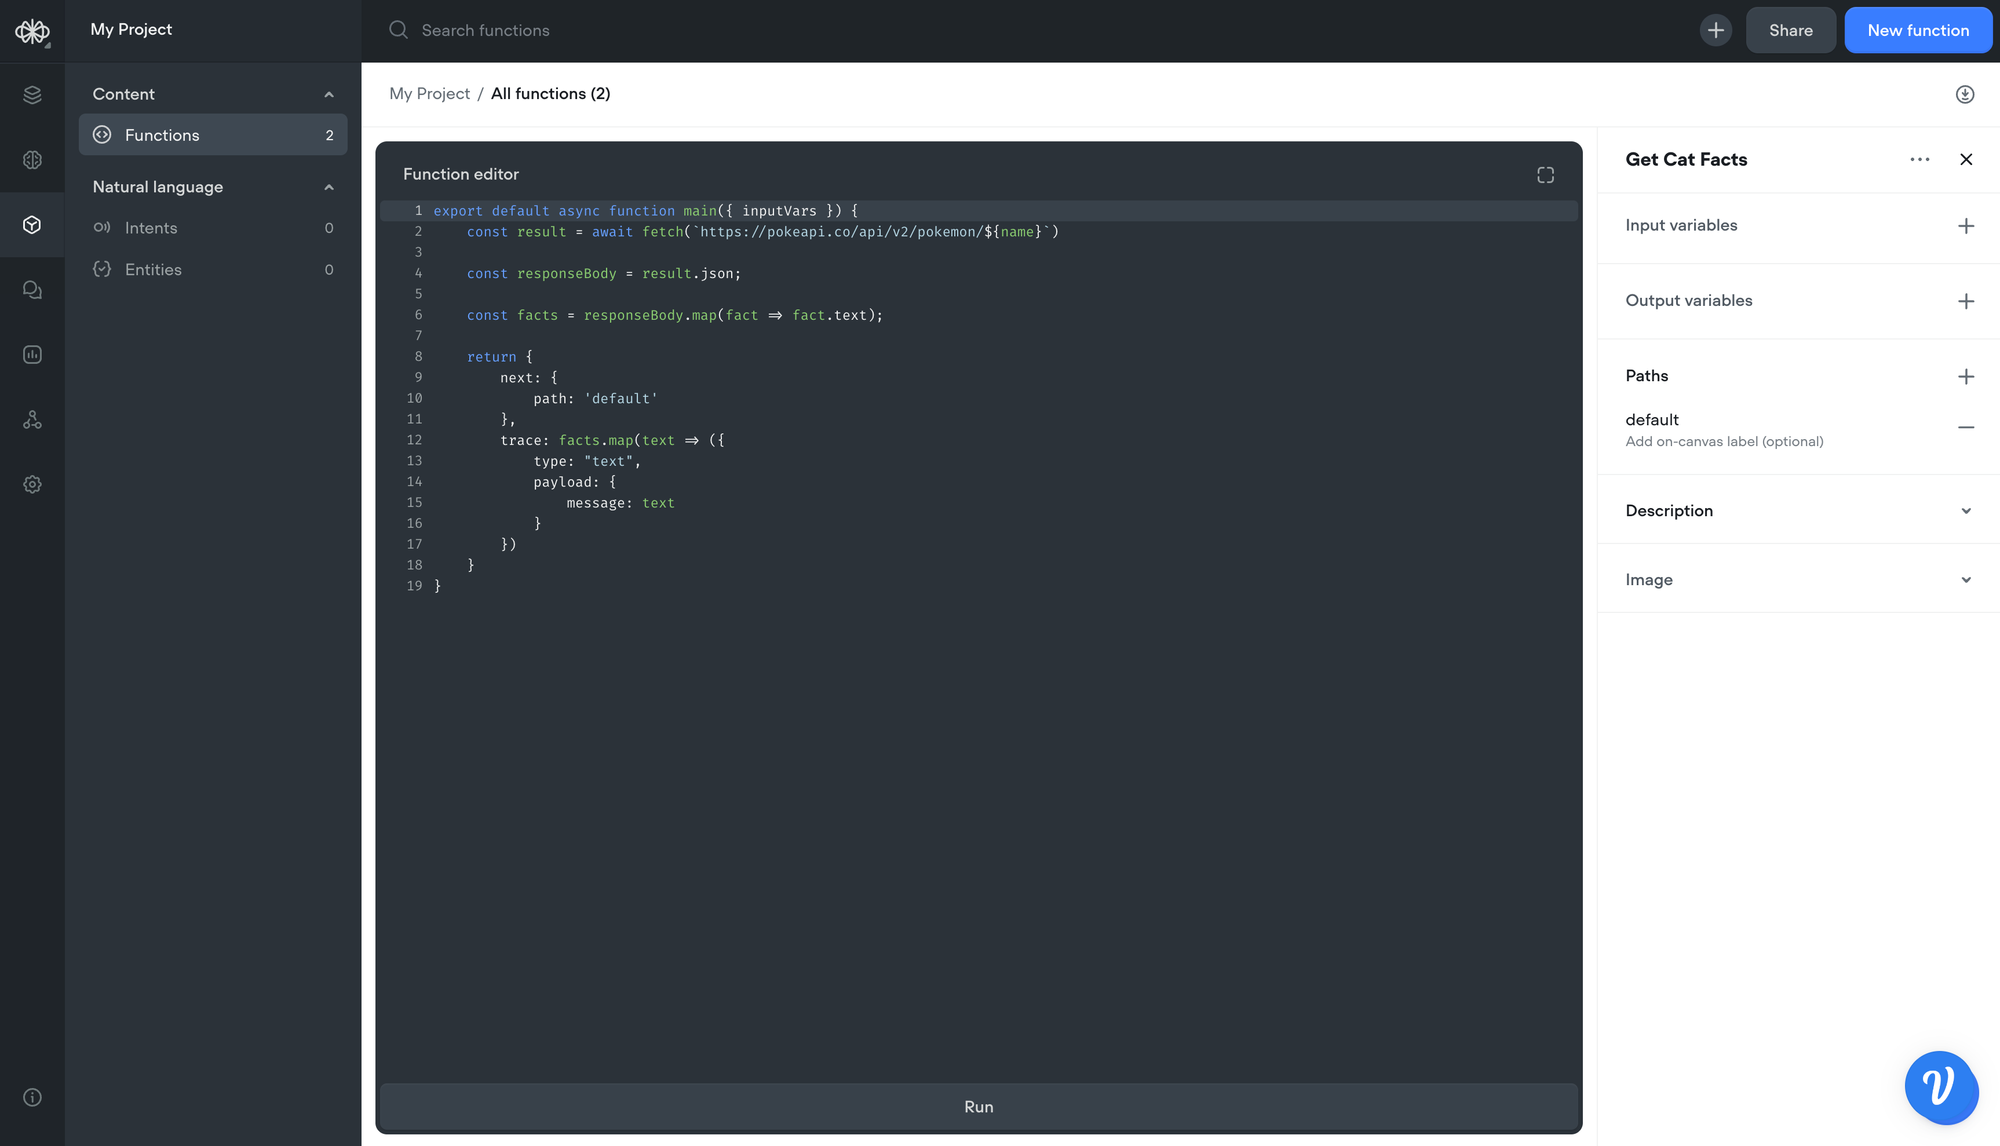
When you run this function within a Voiceflow project, the assistant will recite the fetched cat facts, then move on to the next step through the 'success' port. You can link this to a text step that, for example, could say "Done!" to signal the end of the interaction.
Following a specific path based on user input
Function steps can be coded to leave a specific port based on the user’s input. This is called listen functionality. This behaviour is similar to the Custom Action step.
To use listen functionality, a function step simply needs to output a choice trace(or a custom trace used within your own client) and issue a next many command. The code below demonstrates how this is implemented:
export default async function main(args) {
  return {
    // Choice trace
    trace: [
      {
        type: 'choice',
        payload: {
          buttons: [
            {
              name: "Button A",
              request: { type: 'event_A', payload: { label: 'example' } }
            },
            {
              name: "Button B",
              request: { type: 'event_B', payload: { label: 'another-example' } }
            }
          ]
        }
      }
    ],

    // Next many command
    next: {
      listen: true,
      to: [
        {
          on: { 'event.type': 'event_A' },
          dest: 'path-A'
        },
        {
          on: { 'event.type': 'event_B' },
          dest: 'path-B'
        }
      ],
      defaultTo: 'path-C'
    }
  }
}
Understanding the next many command
Issuing a Next many command causes execution of the Voiceflow diagram to pause at the Function step. Once paused, the function step listens for user input before proceeding. The next many command specifies a list of conditional transfers, which describes what user input causes the function step to leave from a specific path.
A next many command includes the following data:
listen: boolean- Whentrue, it indicates that listen functionality should be enabled.to: array- An array of conditional transfers, objects specifying paths that can be followed and when they should be followed.on: object- Specifies the expected user input as a Mongo-styled querydest: string- The function’s path to leave from
defaultTo: string- The function’s path to leave from, if the incoming request object does not match any of theonqueries in thetoarray.
{
  // ...
  next: {
    listen: true,
    to: [
      {
        on: { 'event.type': 'event_A' },
        dest: 'path-A'
      },
      {
        on: { 'event.type': 'event_B' },
        dest: 'path-B'
      }
    ],
    defaultTo: 'path-C'
  }
}
When listen functionality causes execution to pause at the function step, the function step is said to be listening for user input. The next time you interact with your assistant by contacting the Dialog Manager API, the incoming request object is checked against the on objects specified in the next many command.
When we find the first on query matching the incoming request object, the function step will leave from the path specified in dest. Essentially, the behaviour of the to and defaultTo properties are similar to if and else statements.
As an example, suppose that the function step received the following user input:
// request object from button B
{
  type: 'event_B',
  payload: { label: 'another-example' }
}
The first conditional transfer in the to array is shown below. This conditional transfer expects that the type property of the request object has value 'event_A'. The request object actually has the value event_B for type. Therefore, we do not follow 'path-B'
{
  on: { 'event.type': 'event_A' }, // Does not match - 'event_A' != 'event-B'
  dest: 'path-A'
}
The second conditional transfer in the to is shown below. Here, the conditional transfer expects that the type property has value event_B, which it does. Therefore, the request object causes the function step to leave from 'path-B'
{
  on: { 'event.type': 'event_B' }, // Matches! - 'event_B' == 'event-B'
  dest: 'path-B'                   // Therefore, follow 'path-B'
}
If the second conditional transfer did not match the request object, then we will have exhausted every conditional transfer in to. Thus, the function step would leave from the path specified in defaultTo, that is, path-C.
Understanding the choice trace
The choice trace allows the function code to render buttons which transmit a pre-defined request object to the listening function step.
If an official Voiceflow UI client (such as our Prototype Tool or [react-chat](https://github.com/voiceflow/react-chat) library) receives a choice trace, then it is rendered as clickable buttons.
For example, in the example above, we defined the following choice trace:
{
  type: 'choice',
  payload: {
    buttons: [
      {
        name: "Button A",
        request: { type: 'event_A', payload: { label: 'example' } }
      },
      {
        name: "Button B",
        request: { type: 'event_B', payload: { label: 'another-example' } }
      }
    ]
  }
}
Clicking on “Button A” sends the following request payload to the general-runtime
{ type: 'event_A', payload: { label: 'example' } }
Recall that our next many command was defined like so:
{
  // ...
  next: {
    listen: true,
    to: [
      {
        on: { 'event.type': 'event_A' },
        dest: 'path-A'
      },
      {
        on: { 'event.type': 'event_B' },
        dest: 'path-B'
        }
      ],
      defaultTo: 'path-C'
  }
}
Therefore, clicking “ButtonA” will cause the function step to leave from 'path-A'
Listen functionality with carousel and card
Carousels and cards may define buttons which can trigger listen functionality.
Card with listen functionality
export default async function main(args) {
  return {
    // Next many command
    next: {
      listen: true,
      to: [
        {
          on: { 'event.type': 'event_A' },
          dest: 'path-A'
        },
        {
          on: { 'event.type': 'event_B' },
          dest: 'path-B'
        },
      ],
      defaultTo: 'default'
    },
    trace: [
      {
        type: "cardV2",
        payload: {
          title: "Card title",
          description: { text: "Card description" },
          imageUrl: "https://image-url.com",
          buttons: [
            {
              name: "Button A",
              request: { type: "event_A" }
            },
            {
              name: "Button B",
              request: { type: "event_B" }
            },
          ]
        }
      }
    ]
  };
}
Carousel with listen functionality:
export default async function main(args) {
  return {
    // Next many command
    next: {
      listen: true,
      to: [
        {
          on: { 'event.type': 'event_A' },
          dest: 'path-A'
        },
        {
          on: { 'event.type': 'event_B' },
          dest: 'path-B'
        },
        {
          on: { 'event.type': 'event_C' },
          dest: 'path-C'
        },
        {
          on: { 'event.type': 'event_D' },
          dest: 'path-D'
        },
      ],
      defaultTo: 'default'
    },
    trace: [
      {
        type: "carousel",
        payload: {
          cards: [
            {
              title: "First card",
              description: { text: "Description of first card" },
              imageUrl: "https://first-image.com",
              buttons: [
                {
                  name: "Button A",
                  request: { type: "event_A" }
                },
                {
                  name: "Button B",
                  request: { type: "event_B" }
                },
              ]
            },
            {
              title: "Second card",
              description: { text: "Description of second card" },
              imageUrl: "https://second-image.com",
              buttons: [
                {
                  name: "Button C",
                  request: { type: "event_C" }
                },
                {
                  name: "Button D",
                  request: { type: "event_D" }
                },
              ]
            },
          ]
        }
      }
    ]
  };
}
Specification
Node modules imports
Functions code does not fully support module imports, whether it be the CommonJS format or ESModule format.
Function Code Specification
- Written in JavaScript / ECMAScript.
- Contains a default exported main function.
- Accepts a single argument called the argument object.
- The argument object contains a field called
inputVarscontaining input variable values passed by the step. - Returns runtime commands to dictate the assistant's actions.
Runtime Commands
The RuntimeCommands is a JSON object, which when returned, specifies the behaviour of a function step. Three types of commands are supported:
- Next Command: Dictates the path to follow after the function executes.
- Output Variables Command: Sets the output variables with the values to be used later in the conversation.
- Trace Command: Produces traces as part of the agent's response.
The schema for the runtime commands is given below as a TypeScript interface:
interface RuntimeCommands {
	next?: NextOneCommand | NextManyCommand;
	trace?: Trace[];
	outputVars?: Record<string, string | number | boolean>;
}

interface NextOneCommand {
	path: string;
}

interface NextManyCommand {
	listen: boolean;
	defaultTo: string;
	to: Array<{
		on: MongoQueryObject;
		dest: string;
	}>
}
Next command with a default port
If the function has no paths defined, then a default port is automatically generated. You do not need to send a next command to leave through the default port.
on query
on queryThe NextManyCommand supports an object of type QueryObject for the on property. This QueryObject is exactly the type of a Mongo query object, used for read operations in MongoDB.
Under the hood, the sift.js library to validate that the incoming request object matches an on query using the following logic:
[requestObject].filter(sift(on)).length > 0
Example 1 - Exact match
Suppose we have the following on query
on: {
  'event.type': 'event_A'
}
Suppose we are given the following request objects:
{ type: 'event_A', payload: { label: 'example' } } // matches
{ type: 'event_B', payload: { label: 'example' } } // does not match
{ payload: { label: 'example' } }                  // does not match
{ Type: 'event_A', payload: { label: 'example' } } // does not match
Example 2 - $in operator
Suppose we have the following on query
on: {
  'event.type': { $in: ['california', 'new york'] }
}
Suppose we are given the following request objects:
{ type: 'california', payload: { label: 'example' } }.      // matches
{ type: 'new york', payload: { label: 'another example' } } // matches
{ type: 'washington', payload: { label: 'example' } }.      // does not match
{ payload: { label: 'example' } }.                          // does not match
Example 3 - Matching multiple properties
Suppose we have the following on query
on: {
  'event.type': 'event_A',
  'event.payload.label': 'example'
}
Suppose we are given the following request objects:
{ type: 'event_A', payload: { label: 'example' } }.        // matches
{ type: 'event_A', payload: { label: 'another example' } } // does not match
Supported Traces
Traces are response segments from an interaction with the assistant. Voiceflow supports various trace types, including text, visual content, cards, and more. Below are the TypeScript schemas for the supported trace types:
Available on all project types
interface VisualTrace {
  type: "visual",
  payload: {
    image: string;
  }
}

interface DebugTrace {
  type: "debug",
  payload: {
    message: string;
  }
}

interface GeneralButton {
  name: string;      // button label
  request: {         // request object sent to `general-runtime` when button is clicked
    type: string;    // user-defined type value
    payload?: Record<string, any>; // optional payload with any data
  }
}

interface ChoiceTrace {
  type: 'choice',
  payload: {
    buttons: Array<GeneralButton>
  }
}
Available on chat projects
interface TextTrace {
  type: "text";
  payload: {
    message: string;
  }
}

interface URLButton {
  name: string;
  payload: {
    actions: Array<{
      type: "open_url",
      url: string;
    }>;
  }
}

interface Card {
  imageUrl: string;
  title: string;
  description: {
    text: string;
  };
  buttons?: Array<URLButton | GeneralButton>;
}

interface CardTrace {
  type: "cardV2",
  payload: Card;
}

interface CarouselTrace {
  type: "carousel",
  payload: {
    cards: Array<Card>;
  }
}
Available on voice projects
interface SpeakTrace {
  type: "speak";
  payload: {
    message: string;
  }
}

interface AudioTrace {
  type: "audio";
  payload: {
    src: string; // `src` must be base64 audio data encoded as a string
  }
}
Voiceflow Fetch API
Functions code has access to a modified fetch API, called the Voiceflow Fetch APl. This is mostly identical to the standard Fetch API, but there are some important differences.
For example, to perform a POST request:
- The first argument of
fetchis the URL of the server - The second argument is an options object supporting the standard fetch options such as
method,headers, andbody
await fetch(
  `<YOUR-NGROK-URL-HERE>`,
  {
    method: 'POST',
    headers: {
      "Content-Type": "application/json",
    },
    body: JSON.stringify({
      name,
      age
    })
  }
);
The main difference with the standard Fetch API is how to access the response body of a fetch request. In the standard Fetch API, you would use the .json() method. However, in the Voiceflow Fetch API, the response body is available through the `` field.
// Standard Fetch API
const response = await fetch("https://someurl.com");
const responseBody = await response.json();

// Voiceflow Fetch API
const responseBody = (await fetch("https://someurl.com")).json;
Extended Fetch Options
To change how the response body is parsed, you may pass in a third argument to fetch called the extended fetch options. For example, to parse the response instead as plain text, we would do the following:
const responseBody = await fetch(
	"https://someurl.com",
	requestInit,
	{ parseType: 'text' }
);
const responseContent = responseBody.text;
The type definition for the extended fetch options is given below:
export interface ExtendedFetchOptions {
    parseType?: 'arrayBuffer' | 'blob' | 'json' | 'text';
}
To access the parsed result, access the corresponding property of the return value like so:
const data = (await fetch(url, requestInit, { parseType: 'arrayBuffer' })).arrayBuffer;

const data = (await fetch(url, requestInit, { parseType: 'blob' })).blob;

const data = (await fetch(url, requestInit, { parseType: 'json' })).json;

const data = (await fetch(url, requestInit, { parseType: 'text' })).text;
Best Practices
Add designer-friendly documentation
Functions are intended to be build by code-literate developers and typically used by non-technical designers.
When building your function, take advantage of the built-in documentation features.
- Function description - Use the Description field of a function definition to describe the purpose of a function, give some example use-cases, etc.
- Variable documentation - Use the variable-level documentation fields to describe the purpose of a variable, the acceptable range of argument values, etc.
- Image - Use the Image field of a function definition to provide a visual cue on the function’s purpose. Adding a unique icon to a function also helps with its readability as a step on the Voiceflow canvas.
Additionally, your documentation should be aimed towards a non-technical audience. It should use simple language that does not require an understanding of coding. This allows your function to be usable by a wider audience, as not everyone using Voiceflow is code literate.
Debugging functions
A trace command can issue a debug trace, a type of trace that should include debugging information.
Debug traces are not visible in production, and therefore, are not seen by your users. However, they are visible on the Voiceflow prototype tool and provide diagnostic information that helps the designer resolve bugs.
For example, in the functions code below we return a debug trace:
export default async function main(args) {
  return {
    traces: [
      {
        type: "text",
        payload: {
          message: `Attempting to retrieve information on "Tony Rossi"...`,
        },
      },
      {
        type: "debug",
        payload: {
          message: `Failed to retrieve information for user "Tony Rossi"`,
        },
      },
    ],
  };
}
This debug trace would appear on the Prototype Tool and the Functions test modal:
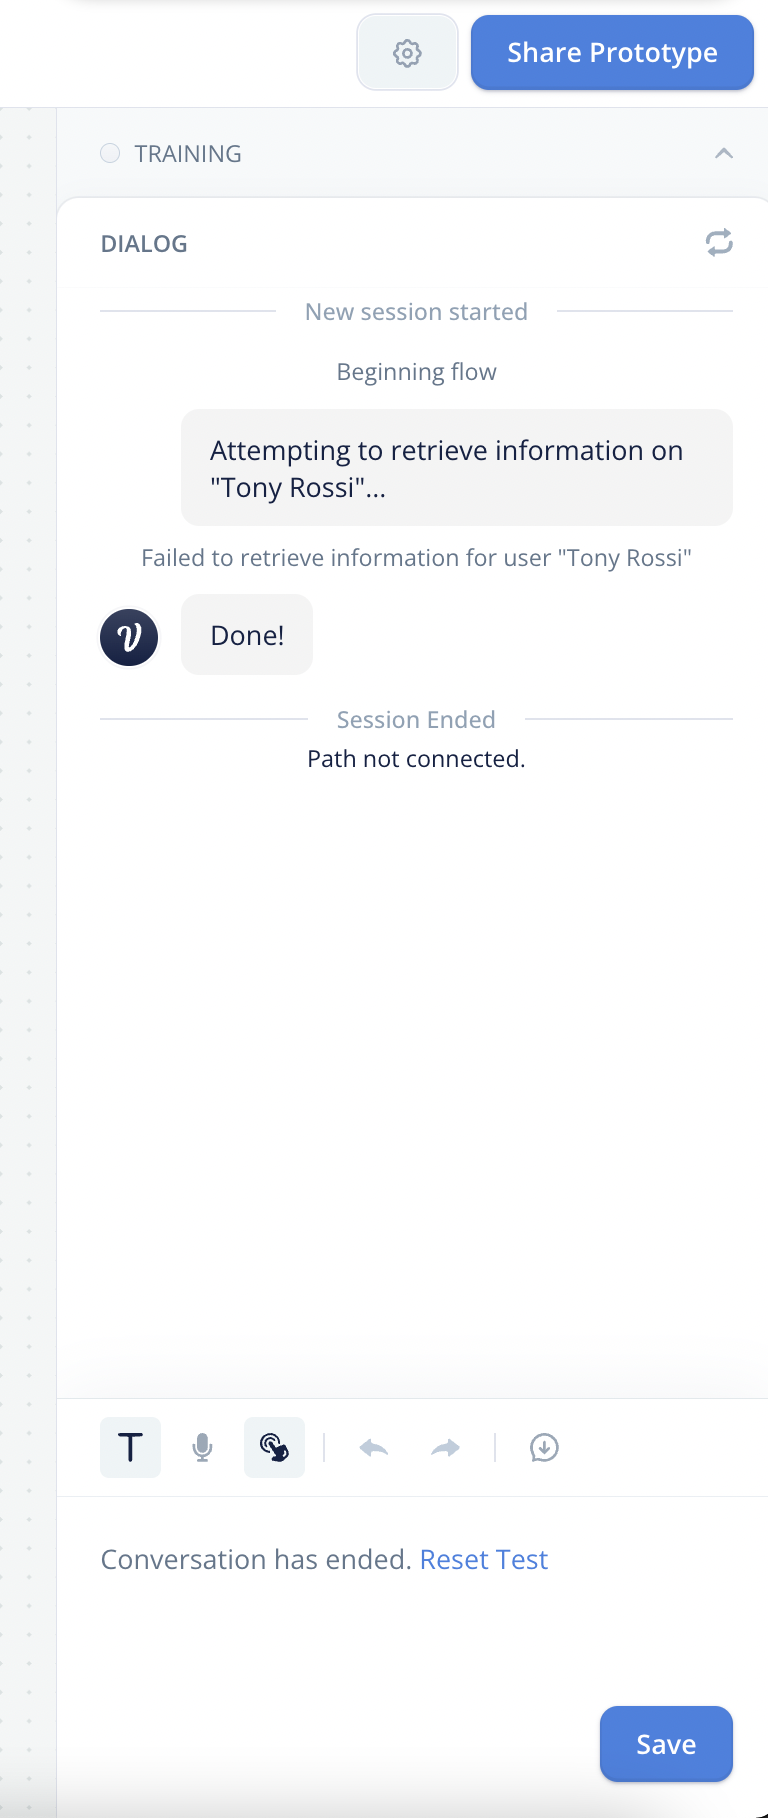
Use debug traces to provide helpful error messages, so that designers can troubleshoot an issue and resolve bugs when using your function step.
Avoid embedding secrets into functions code
Many APIs require sensitive values such as API keys to authorize access. It is strongly recommended that you do not directly hardcode such values into the function code.
Voiceflow includes many export features which may download functions content into a shareable file. It possible to accidentally leak these secret values by exporting Voiceflow content, uploading it to a public repository, and having it stolen by a malicious actor.
For production-level use-cases, it is suggested that you deploy a web server and configure its API to accept requests only from our Voiceflow runtime. Your web server can store sensitive values as environment variables instead and make the authorized calls to 3rd party APIs. A function step would call your web server, which in turn calls the 3rd party APIs to achieve some sophisticated integration.
This approach minimizes the risk of accidentally exposing a secret value to the public.
Conclusion
By following the steps and specifications provided in this guide, you can implement robust functions within Voiceflow. These functions can transform user input, interact with APIs, and control the flow of the conversation, enhancing the capabilities of your Voiceflow assistant.
Happy coding, and we look forward to seeing what you build with Voiceflow!
Updated 4 days ago